Battery switch on travel trailer function is crucial for managing your RV’s power. Understanding how these switches work – whether rotary, push-button, or electronic – is key to preventing dead batteries and maximizing your off-grid adventures. This guide breaks down the different types, their pros and cons, and how to troubleshoot common issues, all while keeping it simple and practical.
We’ll cover everything from safely using your switch to integrating it with other systems like solar panels and inverters. Think of this as your go-to resource for keeping your travel trailer’s electrical system running smoothly, no matter where your adventures take you.
Types of Battery Switches in Travel Trailers
Choosing the right battery switch for your travel trailer is crucial for managing your power system effectively and safely. Different types offer varying levels of complexity, features, and cost. Understanding these differences will help you make an informed decision.
Rotary Battery Switches
Rotary switches are a classic and common choice in travel trailers. They’re essentially a dial that you rotate to select different battery configurations (e.g., battery 1 only, battery 2 only, both batteries combined, or all batteries off). These switches are generally durable and relatively inexpensive.Advantages of rotary switches include their simplicity, ease of understanding, and low cost. Disadvantages include the potential for wear and tear on the internal mechanism over time, and the fact that they only offer a limited number of switching options.
Installation is usually straightforward, requiring only basic wiring skills.
Push-Button Battery Switches
Push-button switches offer a more modern alternative to rotary switches. They typically use individual buttons to control each battery or battery bank, providing more granular control over your power system. Some push-button switches incorporate LED indicators to show the current battery status.Push-button switches offer the advantage of clear visual indication of the battery status and more precise control. However, they can be slightly more expensive than rotary switches and may be more complex to install, potentially requiring more wiring.
They may also be more prone to failure of individual buttons compared to a single rotary mechanism.
Okay, so you’re dealing with your travel trailer’s battery, right? Understanding the battery switch is key. Check out this super helpful guide on the battery switch on travel trailer function for a detailed breakdown. It explains how to use it properly to avoid draining your battery. Then, for a slightly different perspective, another great resource is this article on battery switch on travel trailer function which offers some troubleshooting tips.
Mastering this switch will keep your trailer powered up and ready for adventure!
Electronic Battery Switches
Electronic battery switches offer the most advanced features, often including remote control capabilities, automatic charging prioritization, and monitoring of battery voltage and current. These switches are often integrated into more sophisticated power management systems.Electronic switches provide the greatest control and monitoring capabilities but come with a significantly higher price tag. They also generally require more technical expertise for installation and troubleshooting.
Okay, so you’re wondering about that battery switch in your travel trailer? It’s super important! Basically, it controls the power flow from your trailer’s batteries. Check out this helpful guide on the battery switch on travel trailer function to understand how to properly use it. Knowing how to use this switch correctly will help prevent battery drain and keep your appliances running smoothly.
For a different perspective, you might also find this resource useful: battery switch on travel trailer function. Both articles explain the same thing, but from slightly different angles. Learning this is key to enjoying your adventures without electrical hiccups!
Maintenance may involve software updates or potential repairs by a specialist.
Comparison Table
| Feature | Rotary Switch | Push-Button Switch | Electronic Switch |
|---|---|---|---|
| Cost | Low | Medium | High |
| Complexity | Low | Medium | High |
| Control | Basic | Intermediate | Advanced |
| Maintenance | Low | Low to Medium | Medium to High |
| Durability | Good | Good | Variable, depending on quality |
Troubleshooting Common Battery Switch Issues

Dealing with a faulty battery switch in your travel trailer can leave you stranded without power. Fortunately, most problems are relatively straightforward to diagnose and fix with some basic tools and knowledge. This section will guide you through common issues and how to resolve them.
Battery switch problems often stem from three main culprits: malfunctioning internal components, corrosion on terminals, and loose or damaged connections. These issues can prevent proper power flow, leading to dead batteries or a complete lack of power to your trailer’s systems. Regular inspection and maintenance can significantly reduce the likelihood of these problems.
Identifying Common Battery Switch Problems
Common problems include a switch that won’t turn, a switch that doesn’t isolate batteries correctly, and a switch that causes sparking or overheating. Corrosion is a frequent offender, building up on the terminals and hindering electrical conductivity. Loose connections, often due to vibration during travel, can also interrupt the circuit. A visually inspected switch might appear fine, yet still cause problems due to internal damage.
Troubleshooting Steps for a Non-Functioning Battery Switch
Before diving into more complex diagnostics, begin with the simplest checks. First, visually inspect the switch for any obvious signs of damage, corrosion, or loose wiring. Clean any corroded terminals with a wire brush and baking soda solution, then rinse thoroughly with water and allow to dry completely. Tighten all connections to ensure a secure fit. If the problem persists after this initial inspection, proceed to more advanced troubleshooting.
Diagnosing Battery Switch Problems with a Multimeter
A multimeter is invaluable for pinpointing the exact location of the problem within the battery switch system. Here’s how to use it:
First, ensure your multimeter is set to the DC voltage setting. Then, measure the voltage directly across the battery terminals. A healthy battery should read around 12.6 volts when fully charged. If the voltage is low, the problem likely lies with the battery itself, not the switch. If the voltage is good, check the voltage at the output terminals of the switch.
A significant voltage drop indicates a problem within the switch or its wiring.
Next, check the continuity of the switch itself. Set your multimeter to the continuity setting (often represented by a diode symbol). Touch the probes to the input and output terminals of the switch in different positions (e.g., with the switch on and off). A good switch will show continuity when the switch is in the “on” position and no continuity when it’s “off”.
A lack of continuity indicates a broken internal connection.
Troubleshooting Flowchart for Battery Switch Malfunctions, Battery switch on travel trailer function
Imagine a flowchart with these steps:
Start -> Visual Inspection (Corrosion, Loose Connections) -> Clean/Tighten -> Test -> Functioning? (Yes -> End, No -> Multimeter Voltage Check at Battery and Switch Output) -> Significant Voltage Drop? (Yes -> Wiring/Switch Problem, No -> Multimeter Continuity Check) -> Continuity? (Yes -> Internal Switch Problem, No -> Wiring Problem) -> End
This flowchart provides a structured approach to troubleshooting, guiding you systematically through the diagnostic process to quickly identify the root cause of the malfunction.
Battery Switch Integration with Other Systems
Your travel trailer’s battery switch isn’t an isolated component; it’s a crucial link in a chain of electrical systems. Understanding its interaction with other parts, like the converter, inverter, and solar panels, is key to maintaining a reliable power supply. A faulty switch can cascade problems throughout your RV’s electrical setup, so proper understanding and maintenance are vital.The battery switch acts as the main on/off control for your house batteries.
It determines which power sources feed your trailer’s systems and protects them from potential short circuits or overloads. Knowing how it integrates with other systems helps you troubleshoot problems and maximize your power management.
Impact of a Faulty Battery Switch on Other Electrical Components
A malfunctioning battery switch can lead to several problems. For example, if the switch is stuck in the “off” position, none of your house batteries will power your appliances. Conversely, if it’s stuck “on,” your batteries might drain completely even when not in use, leading to a dead battery and the inability to start your trailer’s appliances. A faulty switch can also cause intermittent power issues, making it difficult to diagnose the root cause of the problem.
In more severe cases, a short circuit in the switch could damage other electrical components, requiring expensive repairs. Regular inspection and testing of your battery switch are crucial for preventing these issues.
Connecting a New Battery to the Existing System
Adding a new battery to your system requires careful attention to safety and proper wiring. Before connecting a new battery, ensure the system is completely disconnected from power sources – both shore power and the battery switch should be turned off. Next, connect the new battery’s positive (+) terminal to the positive bus bar using appropriately sized and insulated wire.
Repeat this process for the negative (-) terminal. Secure all connections with appropriate fasteners to prevent any accidental disconnections. Finally, double-check all connections before turning the battery switch back on. Always consult your RV’s wiring diagram and, if unsure, seek professional assistance.
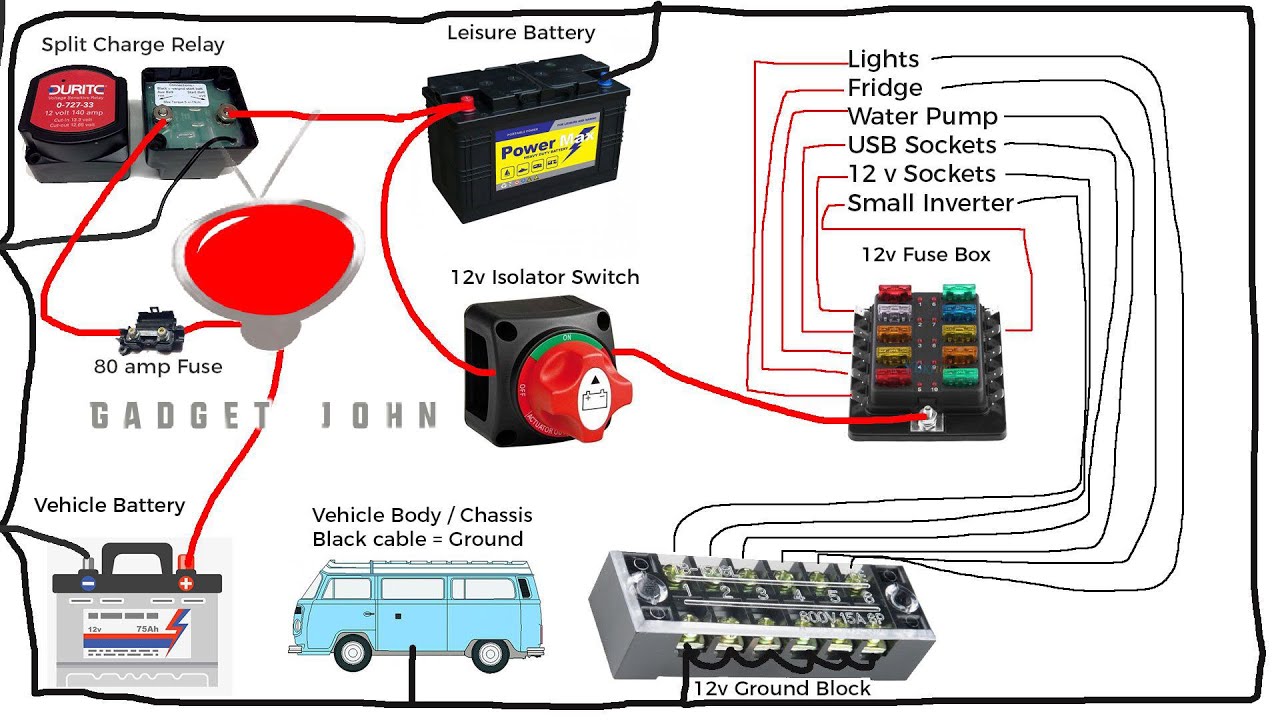
Typical Travel Trailer Battery Switch System Wiring Diagram
Imagine a diagram showing a battery switch located centrally. Two heavy-gauge wires (typically red for positive and black for negative) connect directly to the battery terminals. From the battery switch, several other wires branch out. A red wire from the “house” side of the switch leads to a fuse block or circuit breaker panel which then distributes power to the trailer’s 12V appliances (lights, water pump, etc.).
Another red wire may run to a solar charge controller, allowing the solar panels to charge the batteries when the switch is in the “on” position. A black wire from the “house” side connects to the negative bus bar, grounding the system. There may also be a separate set of wires (possibly a different color, such as blue or yellow) connecting the switch to the chassis ground.
A thicker red wire from the “start” side of the switch goes to the vehicle’s starting battery (allowing you to start the engine and charge the house batteries), and a matching black wire to the chassis ground. This setup ensures that the house batteries are only connected to the trailer’s systems when the switch is turned on, and that the starting battery is only used for starting the engine.
All wires should be appropriately sized for the current they carry, and proper use of fuses and circuit breakers protects the system from overloads.
Mastering your travel trailer’s battery switch is about more than just flipping a lever; it’s about ensuring reliable power for your trips. By understanding the different types of switches, their functions, and common troubleshooting techniques, you’ll be equipped to handle any electrical situation confidently and safely. Remember, regular maintenance and safe practices are key to extending the life of your battery switch and avoiding costly repairs.
Happy travels!
Essential Questionnaire: Battery Switch On Travel Trailer Function
What happens if my battery switch fails?
A failed switch can lead to dead batteries, inability to use appliances, and potentially damage to other electrical components. You may need to replace the switch.
How often should I check my battery switch?
Visually inspect it monthly for corrosion or loose connections. Regularly test your battery levels too.
Can I install a battery switch myself?
While possible, it’s recommended to consult a professional electrician, especially if you’re not comfortable working with 12V systems.
What type of multimeter do I need to test my battery switch?
A basic multimeter with voltage and continuity testing capabilities is sufficient.
